
Metal roof flashing is the thin, formed metal barrier installed at every seam, edge, and penetration of a roof to direct water away from vulnerable joints before it can reach the deck below. When flashing is installed correctly, a metal roof can shed water reliably for 40 to 70 years. When it is rushed, mismatched, or sealed with the wrong materials, leaks typically appear within the first 5 to 10 years and bring rotted decking, ruined insulation, and stained ceilings with them. The installation sequence matters just as much as the flashing material itself, which is why homeowners across Beavercreek and surrounding areas often ask what a correct flashing job actually looks like.
- What flashing does: It seals the joints where shingles, panels, walls, chimneys, vents, and valleys meet so water cannot reach the roof deck.
- Why installation order matters: Flashing relies on gravity, overlap, and sequencing, not caulk, to stay watertight for decades.
- What you will learn: The 7 step installation process, the most common installation mistakes, real cost ranges, and answers to the questions homeowners ask most.
Why Metal Roof Flashing Is the Most Important Leak Defense
Metal roof flashing carries more waterproofing responsibility than any other component on a sloped roof. Shingles and metal panels shed water across open roof surfaces, but flashing is what protects every transition, penetration, and edge.
What Is Roof Flashing and Where Is It Installed?
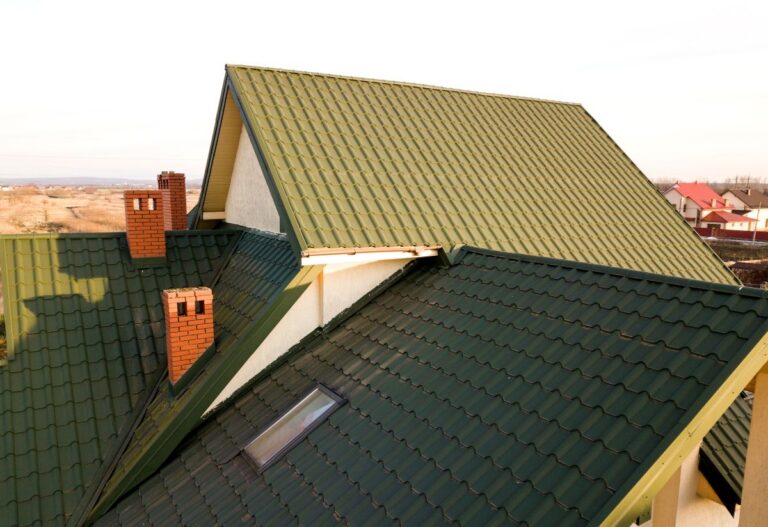
Roof flashing is a thin, corrosion resistant metal product (typically galvanized steel, aluminum, copper, or coated steel) installed wherever the roof surface meets a wall, chimney, skylight, vent pipe, valley, or roof edge. These transition points create natural gaps that shingles and panels cannot seal on their own, so flashing forms a continuous, sloped pathway that keeps water moving toward the gutters. On a typical home in Beavercreek and surrounding areas, flashing is installed at roof to wall intersections, around chimneys, along open and closed valleys, at every plumbing vent and exhaust stack, around skylights, and along the eaves and rakes as drip edge.
- Step flashing: L shaped pieces woven into each shingle course where a sloped roof meets a vertical wall.
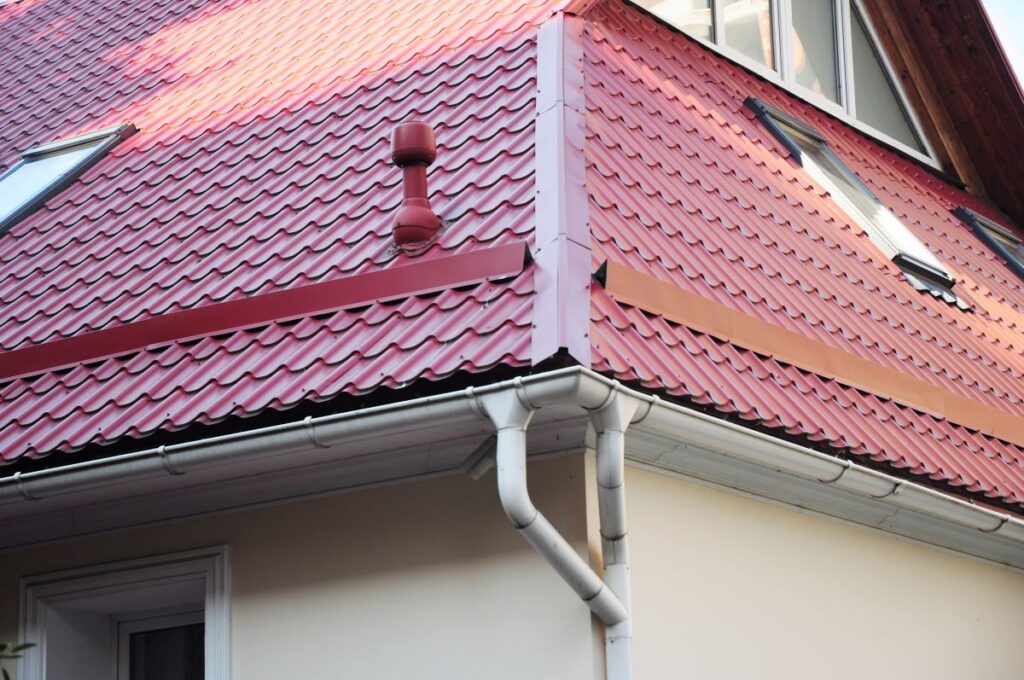
- Counter flashing: A second, upper layer cut into masonry or siding that covers the top of the base flashing.
- Valley flashing: A continuous metal pan installed in roof valleys where two slopes converge.
- Drip edge: Bent metal installed at eaves and rakes to direct water into the gutter and away from the fascia.
How Poor Flashing Causes Hidden Water Damage
Poor flashing causes hidden water damage because most flashing leaks do not produce visible drips for months or even years. A single misaligned step flashing piece can let a small volume of wind driven rain seep behind the siding and soak the wall sheathing repeatedly, with the only outside clue being a faint stain near a ceiling corner. By the time a homeowner notices the stain, the underlying decking, framing, and insulation may already need replacement, which is why proactive inspection and correct installation matter so much. In humid Ohio summers and freeze thaw winters, undetected flashing leaks are one of the leading causes of structural rot and indoor mold growth.
- Slow drywall staining: Brown or yellow rings on ceilings and upper walls, often near chimneys or skylights.
- Musty attic odors: Caused by trapped moisture saturating insulation and roof sheathing.
- Rusted nails and brackets: Visible from inside the attic on rafters and trusses.
- Peeling paint near eaves: A sign that water is wicking down behind the fascia from a failed drip edge.
7 Step Process for Installing Metal Roof Flashing Correctly
A proper metal roof flashing installation follows a specific sequence that prioritizes overlap, gravity, and material compatibility over caulk. Skipping or reordering any of these steps creates a leak path that sealants cannot reliably close, no matter how much product is applied.
1. Inspect and Prep the Substrate
Inspect and prep the substrate before any flashing touches the roof, because flashing installed over rotted decking or torn underlayment will fail regardless of workmanship. A qualified installer walks the entire roof field, removes the existing flashing and surrounding shingles or panels, and probes the sheathing for soft spots. Any decking that flexes more than 1/4 inch under foot pressure is replaced with new 1/2 inch or 5/8 inch CDX plywood, and synthetic underlayment is rolled out over the bare deck. In a metal roof installation, an ice and water shield is also applied along eaves, valleys, and around penetrations to provide a self sealing backup layer beneath the flashing.
- Deck soundness: Replace any sheathing that is delaminated, soft, or rot stained.
- Clean fastening surface: Sweep debris, old sealant, and rust before installing new flashing.
- Ice and water shield: Install a minimum 36 inch wide self adhered membrane at eaves and valleys.
- Square measurements: Confirm wall, chimney, and skylight dimensions before fabricating flashing.
2. Select Compatible Flashing Materials
Selecting compatible flashing materials prevents galvanic corrosion, which can eat through metal flashing in as little as 5 years when dissimilar metals are paired. For a steel metal roof, galvanized or coated steel flashing is the typical match, while aluminum or copper roofs require flashing of the same family. Fasteners must also match: stainless or coated screws with EPDM washers are standard for metal roof applications. Material thickness matters too, with most quality flashing falling in the 24 to 26 gauge range for steel and 0.032 to 0.040 inch range for aluminum.
- Match the panel: Use the same base metal for flashing and panels whenever possible.
- Compatible fasteners: Stainless steel screws with bonded neoprene or EPDM washers.
- Avoid aluminum on masonry: Alkaline mortar accelerates aluminum corrosion at chimneys.
- Use butyl tape, not caulk: Butyl forms a permanent gasket between metal lap joints.
3. Install Drip Edge at the Eaves First
Install drip edge at the eaves first because it sits at the lowest point of the roof and must shed water into the gutter without lifting under the underlayment. Drip edge is bent metal with a vertical leg that hangs over the fascia and a horizontal flange that lies on the roof deck. The eave drip edge goes on before the underlayment so the membrane laps over it, while the rake drip edge goes on after the underlayment so it laps over the top edge. Fasteners are spaced 12 inches on center and set at least 1 inch back from the edge to prevent splitting.
- Eave first sequencing: Underlayment laps over the top of eave drip edge.
- Rake last sequencing: Rake drip edge laps over the underlayment.
- End laps: Overlap drip edge pieces a minimum of 2 inches at every joint.
- Fastener spacing: 12 inches on center using corrosion resistant nails or screws.
4. Layer Valley Flashing Before Panels
Layering valley flashing before panels is essential because valleys carry the highest volume of runoff on a metal roof. A continuous, formed metal valley pan (typically 24 inches wide or wider) is installed over an ice and water shield, then secured along its outer edges only so the center remains free to expand and contract. The metal panels are then trimmed and installed over the valley flashing with a 4 to 6 inch gap on each side so water flows down the pan rather than under the panels. Closure strips and butyl tape seal the joint between panels and valley without creating fastener penetrations in the water channel.
- Continuous pan: Use a single piece of valley flashing whenever the run allows.
- Edge fastening only: Never fasten through the center of the water channel.
- 4 to 6 inch panel clearance: Keep panel edges back from the valley centerline.
- Hemmed edges: Folded edges stiffen the pan and prevent capillary draw of water sideways.
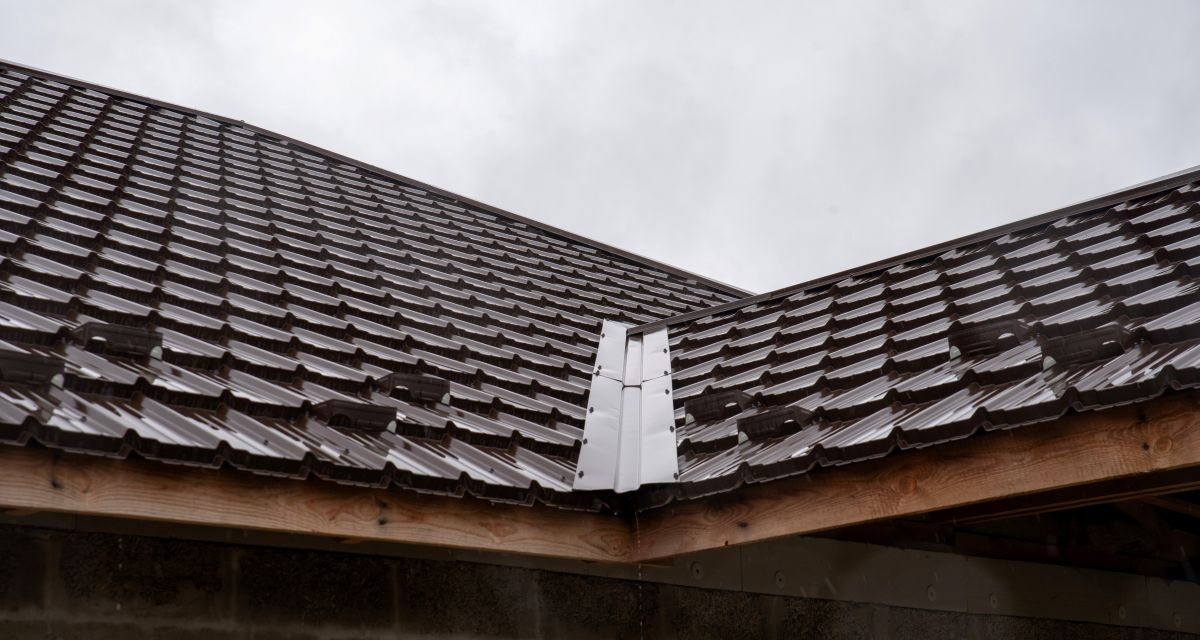
5. Weave Step Flashing at Roof to Wall Intersections
Weaving step flashing at roof to wall intersections is the standard for sealing the joint where a sloped roof meets a vertical wall. Each L shaped piece is installed under the panel or shingle course above it and over the one below, creating a shingled water path that gravity cannot defeat. According to the International Institute of Building Enclosure Consultants (IIBEC), accepted industry standards call for a step flashing vertical leg of at least 4 inches per the NRCA Roofing and Waterproofing Manual, 5 inches per the ARMA Residential Asphalt Roofing Manual, and 6 inches per the SMACNA Architectural Sheet Metal Manual. Counter flashing is then installed over the top edge of the step flashing, either cut into a mortar joint on a brick wall or tucked behind the siding on a framed wall.
- Minimum 4 inch vertical leg: Aligned with NRCA standards for residential step flashing.
- One piece per course: Never substitute a single long strip for individual step pieces.
- Counter flashing on top: Required to cover the upper edge of the step flashing.
- No exposed fasteners in the wall: Penetrations through siding or brick should be avoided.
6. Flash Chimneys, Skylights, and Penetrations
Flashing chimneys, skylights, and penetrations correctly is where most leaks originate, because each of these features moves independently from the roof deck. A chimney requires base flashing at the front, step flashing along the sides, a saddle or cricket on the upslope side (mandatory for chimneys wider than 30 inches), and counter flashing cut into the mortar joints. Skylights are flashed using the manufacturer supplied kit, which includes head, side, and sill pieces specifically formed for the unit. Plumbing vents use a one piece metal flashing boot with an EPDM collar sized to the pipe diameter, fastened over the underlayment and lapped by the panels above.
- Cricket required over 30 inches: A peaked diverter on the upslope side of wide chimneys.
- Manufacturer kits for skylights: Generic flashing voids most skylight warranties.
- Sized pipe boots: A boot that is one size too large will leak within a season.
- Counter flashing into mortar: Cut a reglet 1 inch deep, set the metal, and seal with polyurethane.
7. Seal Seams With Manufacturer Approved Sealant
Sealing seams with manufacturer approved sealant is the final step, and it functions as a backup to mechanical waterproofing, not a substitute for it. Butyl tape is the preferred gasket material between overlapping metal pieces because it remains flexible across a 200 degree temperature swing and does not harden with UV exposure. Exposed seams (such as at panel ends, ridge caps, and counter flashing terminations) are sealed with a high grade polyurethane or tripolymer sealant rated for metal roofing. Silicone caulk and standard latex products are not acceptable, as they break down within a few years and trap moisture against the metal.
- Butyl tape in laps: Hidden between metal layers for a permanent gasket.
- Polyurethane or tripolymer for exposed joints: UV stable and metal compatible.
- No silicone or latex caulk: Both degrade quickly and stain adjacent metal.
- Tooled, not smeared: Sealant should be pressed into the joint, not piled on top.
Common Metal Roof Flashing Installation Mistakes To Avoid
Most flashing leaks trace back to a handful of repeat errors made by inexperienced or rushed crews. Knowing what to watch for can help homeowners verify that their installation will actually last.
Why Over Reliance on Caulk Causes Premature Leaks
Over reliance on caulk causes premature leaks because caulk is not designed to be the primary waterproofing element of a metal roof flashing system. When caulk is used to bridge gaps that should have been closed by correct overlap and step flashing, it begins failing the moment it is applied. UV exposure, freeze thaw cycling, and the natural expansion and contraction of metal panels (which can move up to 1/2 inch over a 20 foot run) crack and pull caulk away from the substrate. Within 2 to 4 years, hairline cracks form and water seeps through, often into hidden cavities where it can damage the structure for years before being noticed.
- Surface only adhesion: Caulk bonds to the top of metal, not into a gasketed joint.
- UV degradation: Most caulks lose flexibility after 2 to 5 years of sun exposure.
- Hides poor workmanship: A heavy caulk bead often signals an underlying installation defect.
- Replaceable, not repairable: Re caulking does not fix the root cause of the leak.
Why Mixing Metals Causes Galvanic Corrosion
Mixing metals causes galvanic corrosion because dissimilar metals in contact with moisture create a low voltage electrical current that eats away at the less noble metal. Pairing aluminum flashing with copper gutters, for example, will corrode the aluminum at the contact point in as little as 3 to 5 years in Ohio’s humid climate. The same problem occurs with the wrong fasteners: a zinc plated nail through copper flashing will rust out and stain the metal below. A qualified installer specifies all flashing, fasteners, and adjacent metal components from the same family to avoid this issue entirely.
- Aluminum and copper: Avoid direct contact, especially in valleys.
- Galvanized and copper: Causes accelerated rusting of the galvanized component.
- Use stainless fasteners: Compatible with almost all roofing metals.
- Isolate when necessary: Use a butyl tape barrier between unavoidable dissimilar metals.
Frequently Asked Questions
How Much Does Metal Roof Flashing Installation Cost?
Metal roof flashing installation typically costs $300 to $1,500 for repairs to a single area such as a chimney or skylight, and $1,500 to $5,000 for a full reflash during a roof replacement in the Beavercreek and surrounding areas market. Material choice, roof complexity, and accessibility all affect pricing. Custom fabricated copper or coated steel flashing sits at the higher end of the range.
How Long Does Properly Installed Metal Roof Flashing Last?
Properly installed metal roof flashing lasts 40 to 70 years when matched to a quality metal roof, with copper flashing reaching 70 to 100 years in many cases. Aluminum and galvanized steel typically last 40 to 50 years. Sealant components such as butyl tape and polyurethane caulk are the limiting factor and should be inspected every 5 to 7 years.
Can I Install Metal Roof Flashing Myself?
Installing metal roof flashing yourself is not recommended for most homeowners because correct sequencing, fastener placement, and material selection require specialized training. A single misaligned step flashing piece can void the manufacturer warranty on the entire roof. Working at heights also presents serious safety risks, with falls from residential roofs causing thousands of injuries each year.
How Often Should Metal Roof Flashing Be Inspected?
Metal roof flashing should be inspected at least once a year and after any major storm, hail event, or high wind event. The NRCA recommends spring and fall inspections to catch sealant fatigue, lifted panels, and corrosion before they turn into active leaks. Homeowners with chimneys, skylights, or older roofs benefit from professional inspections.
Do I Need a Permit To Replace Metal Roof Flashing?
Replacing metal roof flashing as part of a roof replacement typically requires a permit in most Ohio municipalities, including those serving Beavercreek and surrounding areas. Standalone flashing repairs (such as repairing a single chimney or vent) generally do not require a permit. A licensed roofing or restoration contractor will pull the necessary permits as part of a larger reroof.
What Are the Signs My Flashing Is Failing?
Signs your flashing is failing include ceiling stains near chimneys or skylights, visible rust on exposed metal, lifted or curled flashing edges, cracked or peeling sealant, and musty attic odors after rain. Any of these warrant a professional inspection before water damage spreads to framing, insulation, or drywall.
Why Beavercreek Homeowners Trust Johnson Restoration for Metal Roof Flashing
When metal roof flashing fails, the damage rarely stays on the roof. Water finds its way into walls, insulation, ceilings, and framing, and the longer it sits, the more expensive the repair becomes. Johnson Restoration brings over a decade of industry experience to every flashing installation and repair in Beavercreek and surrounding areas, with workmanship warranties, financing options, and the kind of detailed installation practices that prevent leaks instead of just patching them. Whether you are seeing the first stains of a flashing failure or planning a full metal roof installation, contact Johnson Restoration today for a free estimate and let our team protect your home with flashing that is built to last.